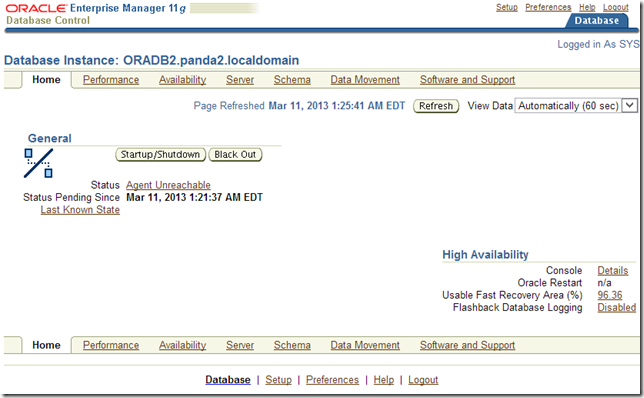
– To implement the solution, please execute the following steps::
1. Stop the agent
2. Remove all the files from AGENT_HOME/sysman/log/ directory.
3. Backup and edit AGENT_HOME/sysman/config/emd.properties.
4. Add this line:
NMUPM_TIMEOUT=120
5. Uncomment: ThreadPoolModel = LARGE
6. start the agent
7. Monitor the performance of the server
11 grudnia 2015
oracle em agent unreachable
10 grudnia 2015
9 grudnia 2015
srvctl
https://oracleexamples.wordpress.com/2010/01/22/most-used-srvctl-commands/
What is srvctl? it is the Server Control Utility, we use SRVCTL to start and stop the database and instances, manage configuration information, and to add, move or remove instances and services.
These are some of the srvctl commands I frequently use, this is not a complete reference guide.
I organized the commands as follow:
- To start a rac database
- To stop a rac database
- To check status and configurations
- To start and stop instances
- To start, stop and manage services
Start a rac database (order: nodeapps – asm – database)
srvctl start nodeapps -n nodename
srvctl start asm -n nodename
srvctl start database -d dbname
options are: srvctl start database -d dbname -o open | -o mount | -o nomount
Stop a rac database (order: database – asm – nodeapps)
srvctl stop database -d dbname -o immediate
options are: srvctl stop database -d dbname -o normal | -o transactional | -o immediate | -o abort
srvctl stop asm -n nodename
options are: srvctl stop asm -n nodename -o immediate
srvctl stop nodeapps -n nodename
To check status and configurations
Nodeapps:
srvctl status nodeapps -n nodename
srvctl config nodeapps -n nodename
ASM:
srvctl status asm -n nodename
srvctl config asm -n nodename
Database:
srvctl status database -d dbname
srvctl config database -d dbname (shows instances name, node and oracle home)
Instance:
srvctl status instance -d dbname -i instancename
Services:
srvctl status service -d dbname
To start and stop instances
srvctl start instance -d dbname -i instancename
srvctl stop instance -d dbname -i instancename
To start, stop and manage services
srvctl status service -d dbname
srvctl config service -d dbname
srvctl start service -d dbname -s servicename
srvctl stop service -d dbname -s servicename
srvctl relocate service -d dbname -s servicename -i instancename -t newinstancename [-f]
17 października 2015
global cache blocks lost
global cache blocks lost–This statistic reveals any block losses during transfers and high values may indicate network problems. When using an unreliable IPC protocol such as UDP, the value for ‘global cache blocks lost’ may be non-zero. If this is the case, then the ratio of ‘global cache blocks lost’ divided by ‘global cache current blocks served’ plus ‘global cache cr blocks served’ should be as small as possible. A non-zero value for ‘global cache blocks lost’ does not necessarily indicate a problem, because Oracle retries the block transfer operation until it is successful. Unlike TCP/IP, UDP/IP is considered unreliable because UDP/IP provides very few error recovery services.
11 grudnia 2014
grant select on all tables
You could, of course, leverage dynamic SQL, i.e.
FOR x IN (SELECT * FROM user_tables)
LOOP
  EXECUTE IMMEDIATE 'GRANT SELECT ON ' || x.table_name || ' TO <<someone>>';
END LOOP;
Of course, if you’re doing this sort of thing, you’d normally grant the privileges to a role and grant that role to one or more users.
Login as your user name and then run the following
declare
cursor c1 is select table_name from user_tables;
cmd varchar2(200);
begin
for c in c1 loop
cmd := ‘GRANT SELECT ON ‘||c.table_name||’ TO YOURUSERNAME’;
execute immediate cmd;
end loop;
end;
22 listopada 2014
Error Opening RPD Online: [nQSError: 46036] Internal Assertion
10 października 2014
ora-00604 timezone region not found sql developer
check timezone in your database
add following entry do sqldeveloper.conf with appropriate timezone name
AddVMOption -Duser.timezone=America/Santiago
restart sqldeveloper
VOILA!
11 sierpnia 2014
APEX upgrade
21 lipca 2014
datapump expdp impdp
CONN / AS SYSDBA
ALTER USER scott IDENTIFIED BY tiger ACCOUNT UNLOCK;
CREATE OR REPLACE DIRECTORY test_dir AS ‘/u01/app/oracle/oradata/’;
GRANT READ, WRITE ON DIRECTORY test_dir TO scott;
expdp scott/tiger@db10g tables=EMP,DEPT directory=TEST_DIR dumpfile=EMP_DEPT.dmp logfile=expdpEMP_DEPT.log
impdp hr/HR directory=DATADUMP dumpfile=FMC_LOGICAL_VESSELS.DMP remap_schema=VTRACK:HR exclude=index,constraint,grant,trigger
expdp user/pass schemas=
dumpfile=
logfile=expdp_
impdp user/pass schemas=schema1 directory=dumpdir \
remap_schema=schema1:schema2 \
dumpfile=schema1.dmp \
logfile=impdp_schema2.log
http://www.oracle-base.com/articles/10g/oracle-data-pump-10g.php
http://oradbaeasy.wordpress.com/2009/06/11/importing-and-exporting-oracle-database-using-datapump-utility/
expdp username/password FULL=y INCLUDE=GRANT INCLUDE= INDEX DIRECTORY=dpump_dir1 DUMPFILE=dba.dmp CONTENT=ALL
17 lipca 2014
table to csv
#!/usr/bin/bash
FILE=”emp.csv”
sqlplus -s scott/tiger@XE < SET PAGESIZE 50000 SPOOL $FILE SELECT * FROM EMP; SPOOL OFF - See more at: http://www.theunixschool.com/2012/12/shell-script-how-to-dump-oracle-table-into-csv-file.html SET PAGESIZE 50000 => Set this to a much bigger value. This value indicates the number of lines per page. The header line will get printed in every page. In order to avoid this, set it to a bigger value so that the header appears only once. SET COLSEP “,” => Setting the column separator to “,”. With this setting, the list displayed by the SELECT clause will be comma separated. This is the most important setting of this script. SET LINESIZE 200 => The number of characters per line. The default is 80 which means after 80 characters, the rest of the content will be in the next line. Set this to a value which is good enough for the entire record to come in a single line. SET FEEDBACK OFF => When a select query is executed, a statement appears at the prompt, say “25 rows selected”. In order to prevent this from appearing in the CSV file, the feedback is put off. SPOOL $FILE => Spool command records the session queries and results into the file specified. In other words, this will write the results of the query to the file. SELECT * FROM EMP => The query which gives the entire table contents of EMP. If only a part of the table is desired, the query can be updated to get the desired result. SPOOL OFF => To stop writing the contents of the sql session to the file. - See more at: http://www.theunixschool.com/2012/12/shell-script-how-to-dump-oracle-table-into-csv-file.html#sthash.XLJ9iSpO.dpuf
SET COLSEP ","
SET LINESIZE 200
SET FEEDBACK OFF
EXIT
EOF
ovm cdrom boot problem
Its funny how things work in Oracle VM ..
I made some changes in configuration file and its working for me.. But I think this needs to be corrected.
xvdb is replaced with hdc..
Before
disk = ['file:/OVS/Repositories/0004fb0000030000aa8563ec6175dcfb/VirtualDisks/0004fb000012000095516dd08c3b253f.img,hda,w', 'file:/OVS/Repositories/0004fb0000030000aa8563ec6175dcfb/ISOs/slampp.iso,xvdb:cdrom,r']
After
disk = ['file:/OVS/Repositories/0004fb0000030000aa8563ec6175dcfb/VirtualDisks/0004fb000012000095516dd08c3b253f.img,hda,w', 'file:/OVS/Repositories/0004fb0000030000aa8563ec6175dcfb/ISOs/slampp.iso,hdc:cdrom,r']
I didn’t upload the iso using OVM managers import option ..Instead i have uploaded the iso file to ISO folder.refreshed repository from Manager..
ISO was reflected in Manager.
Hope this will be helpful for other guys facing similar issue.
———————————————————————————
So you broke lilo. Well done.
Insert your Slackware install DVD or CD1 and boot with defaults.
Once booted:
mount /dev/sda1 /foo
mount –bind /proc /foo/proc
mount –bind /sys /foo/sys
mount –bind /dev /foo/dev
chroot /foo
vi /etc/lilo.conf
lilo
exit
reboot
where /dev/sda1 is your installed / partition. Adjust as necessary.
lilo -F -r /mnt/sda2 -b /dev/sda -C /etc/lilo.conf
2 czerwca 2014
Oracle on Solaris 10 : Fixing the ‘ORA-27102: out of memory’ Error
ASM
http://blog.sina.com.cn/s/blog_4ea0bbed0100zd6d.html
http://docs.oracle.com/cd/E11882_01/server.112/e18951/asmdiskgrps.htm#OSTMG94156
4 marca 2014
Oracle read consistency.
Read consistency is an automatic implementation. It keeps a partial copy of the database in
the undo segments. The read-consistent image is constructed from the committed data in the
table and the old data that is being changed and is not yet committed from the undo segment.
When an insert, update, or delete operation is made on the database, the Oracle server takes
a copy of the data before it is changed and writes it to an undo segment.
All readers, except the one who issued the change, see the database as it existed before the
changes started; they view the undo segment’s “snapshot” of the data.
The relationship between the EMPLOYEES and DEPARTMENTS tables is
an equijoin; that is, values in the DEPARTMENT_ID column in both tables must be equal.
Often, this type of join involves primary and foreign key complements.
Note: Equijoins are also called simple joins or inner joins.
SELECT e.employee_id, e.last_name, e.department_id,
d.department_id, d.location_id
FROM
employees e, departments d
WHERE e.department_id = d.department_id;
SELECT d.department_id, d.department_name, l.city
FROM
departments d, locations l
WHERE
d.location_id = l.location_id
AND d.department_id IN (20, 50);
NATURAL JOIN
SELECT department_id, department_name,
location_id, city
FROM
departments NATURAL JOIN locations ;
USING
SELECT employee_id, last_name,
location_id, department_id
FROM
employees JOIN departments USING (department_id) ;
ON
SELECT e.employee_id, e.last_name, e.department_id,
d.department_id, d.location_id
FROM
employees e JOIN departments d
ON
(e.department_id = d.department_id);
NONEQUIJOINS
SELECT e.last_name, e.salary, j.grade_level
FROM
employees e, job_grades j
WHERE e.salary
BETWEEN j.lowest_sal AND j.highest_sal;
SELECT e.last_name, e.salary, j.grade_level
FROM
employees e JOIN job_grades j
ON
e.salary BETWEEN j.lowest_sal AND j.highest_sal;
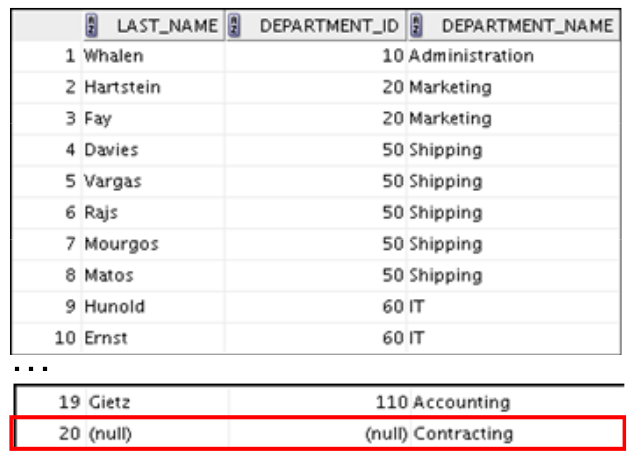
The outer join operator is the plus sign (+)
SELECT e.last_name, e.department_id, d.department_name
FROM
employees e, departments d
WHERE e.department_id(+) = d.department_id ;
SELECT e.last_name, d.department_id, d.department_name
FROM
employees e RIGHT OUTER JOIN departments d
ON
(e.department_id = d.department_id) ;
Self join
SELECT worker.last_name || ‘ works for ‘
|| manager.last_name
FROM
employees worker, employees manager
WHERE worker.manager_id = manager.employee_id ;
UNDO
(5 minut temu)
select * from testable as of timestamp (SysDate – 5/1440)
select * from testtable as of timestamp(’08-Aug-2011 5:00:00 PM’,'DD-MON-YYYY HH:MI:SS AM’);
flashback table testtable to before drop;
12 lutego 2014
22 stycznia 2014
OVM and VMWare comparison.
Migrate from vSphere into Oracle VM 3.0
By Steen Schmidt on Dec 06, 2011
So I just took a vmware image of a Linux converte into a ova (Open Virtualization Archive) file, then I was able to do a import through the OVM manager. When this assemblies had been loaded, it was unpack and the next step was to create a Clone from my new Template.
And “voila”, I had a running VM with Linux in Oracle VM 3.0, imported from VMware.
So it could not be more simple, and it works.
This article covers the steps to migrate a VMware ESX virtual machine over to an Oracle Virtual Machine. These steps should work with either OVM 2.x or 3.x
Step 1.
Download and install “VMware OVFTOOL 1.0” from the VMware site. You must register to get it.
Step 2.
Unzip your VMware appliance into a directory on your windows or linux machine.
Step 3.
Run the following command to export the vmx file to ovf
C:Program FilesVMwareVMware OVF Tool>ovftool.exe –skipManifestCheck c:temp
opsview-applianceopsview-appliance.vmx c:tempjohn.ova
Opening VMX source: c:tempopsview-applianceopsview-appliance.vmx
Opening OVA target: c:tempjohn.ova
Writing OVA package: c:tempjohn.ova
Disk Transfer Completed
Step 4.
Import the charliebrown.ovf into OVM 3.x as an assembly. Once charlie has been imported create a vm from the template as usual.
Step 5.
Grab a glass of milk and a cookie.
Source:
http://www.davemalpass.com/how-to-migrate-vmware-appliances-to-ovm-3/
ORACLE – archive log mode.
SQL> startup mount
ORACLE instance started.

Total System Global Area  184549376 bytes
Fixed Size                  1300928 bytes
Variable Size             157820480 bytes
Database Buffers           25165824 bytes
Redo Buffers                 262144 bytes
Database mounted.

SQL> alter database archivelog;
Database altered.


