apt-get install encfs
add-apt-repository ppa:gencfsm
apt-get update
apt-get install gnome-encfs-manager
apt-get install cryptkeeper
20 marca 2014
ENCFS
18 marca 2014
12 marca 2014
4 marca 2014
Oracle read consistency.
Read consistency is an automatic implementation. It keeps a partial copy of the database in
the undo segments. The read-consistent image is constructed from the committed data in the
table and the old data that is being changed and is not yet committed from the undo segment.
When an insert, update, or delete operation is made on the database, the Oracle server takes
a copy of the data before it is changed and writes it to an undo segment.
All readers, except the one who issued the change, see the database as it existed before the
changes started; they view the undo segment’s “snapshot” of the data.
The relationship between the EMPLOYEES and DEPARTMENTS tables is
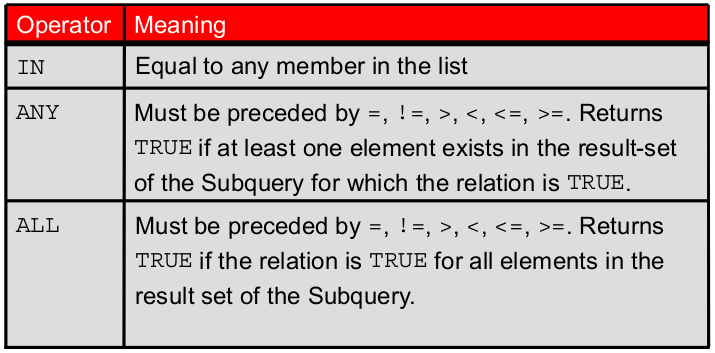
an equijoin; that is, values in the DEPARTMENT_ID column in both tables must be equal.
Often, this type of join involves primary and foreign key complements.
Note: Equijoins are also called simple joins or inner joins.
SELECT e.employee_id, e.last_name, e.department_id,
d.department_id, d.location_id
FROM
employees e, departments d
WHERE e.department_id = d.department_id;
SELECT d.department_id, d.department_name, l.city
FROM
departments d, locations l
WHERE
d.location_id = l.location_id
AND d.department_id IN (20, 50);
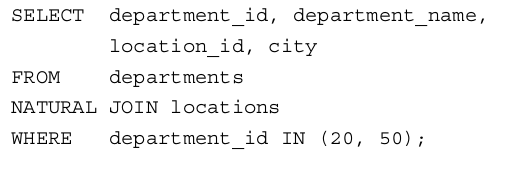
NATURAL JOIN
SELECT department_id, department_name,
location_id, city
FROM
departments NATURAL JOIN locations ;
USING
SELECT employee_id, last_name,
location_id, department_id
FROM
employees JOIN departments USING (department_id) ;
ON
SELECT e.employee_id, e.last_name, e.department_id,
d.department_id, d.location_id
FROM
employees e JOIN departments d
ON
(e.department_id = d.department_id);
NONEQUIJOINS
SELECT e.last_name, e.salary, j.grade_level
FROM
employees e, job_grades j
WHERE e.salary
BETWEEN j.lowest_sal AND j.highest_sal;
SELECT e.last_name, e.salary, j.grade_level
FROM
employees e JOIN job_grades j
ON
e.salary BETWEEN j.lowest_sal AND j.highest_sal;
The outer join operator is the plus sign (+)
SELECT e.last_name, e.department_id, d.department_name
FROM
employees e, departments d
WHERE e.department_id(+) = d.department_id ;
SELECT e.last_name, d.department_id, d.department_name
FROM
employees e RIGHT OUTER JOIN departments d
ON
(e.department_id = d.department_id) ;
Self join
SELECT worker.last_name || ‘ works for ‘
|| manager.last_name
FROM
employees worker, employees manager
WHERE worker.manager_id = manager.employee_id ;
UNDO
(5 minut temu)
select * from testable as of timestamp (SysDate – 5/1440)
select * from testtable as of timestamp(’08-Aug-2011 5:00:00 PM’,'DD-MON-YYYY HH:MI:SS AM’);
flashback table testtable to before drop;
21 lutego 2014
20 lutego 2014
subquery
SELECT last_name, salary, department_id
FROM
employees
WHERE salary IN (SELECT
MIN(salary)
FROM
employees
GROUP BY department_id);
17 lutego 2014
joins
NATURAL JOIN
SELECT employee_id, last_name,
department_name
FROM
hr.employees JOIN hr.departments
USING (department_id) ;
SELECT l.city, d.department_name
FROM
locations l JOIN departments d USING (location_id)
WHERE location_id = 1400;
SELF JOIN
Sometimes you need to join a table to itself. To find the name of each employee’s manager,
you need to join the EMPLOYEES table to itself, or perform a self-join.
SELECT worker.last_name emp, manager.last_name mgr
FROM
employees worker JOIN employees manager
ON
(worker.manager_id = manager.employee_id);
NONEQUIJOINS

To return the unmatched rows, you can use
an OUTER join. An OUTER join returns all rows that satisfy the join condition and also returns
some or all of those rows from one table for which no rows from the other table satisfy the join
condition.
There are three types of OUTER joins:
•LEFT OUTER
•RIGHT OUTER
•FULL OUTER
SELECT e.last_name, e.department_id, d.department_name
FROM
employees e LEFT OUTER JOIN departments d
ON
(e.department_id = d.department_id) ;
This query retrieves all the rows in the EMPLOYEES table, which is the left table, even if there
is no match in the DEPARTMENTS table.
SELECT e.last_name, d.department_id, d.department_name
FROM
employees e RIGHT OUTER JOIN departments d
ON
(e.department_id = d.department_id) ;
This query retrieves all the rows in the DEPARTMENTS table, which is the table at the right,
even if there is no match in the EMPLOYEES table.
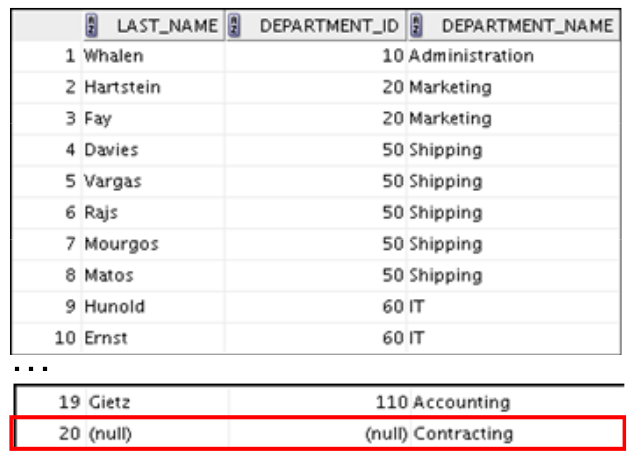
SELECT e.last_name, d.department_id, d.department_name
FROM
employees e FULL OUTER JOIN departments d
ON
(e.department_id = d.department_id) ;
This query retrieves all rows in the EMPLOYEES table, even if there is no match in the
DEPARTMENTS table. It also retrieves all rows in the DEPARTMENTS table, even if there is no
match in the EMPLOYEES table.
——— CARTESIAN PRODUCT ————
SELECT last_name, department_name
FROM
employees CROSS JOIN departments ;
13 lutego 2014
12 lutego 2014
10 lutego 2014
23 stycznia 2014
ESX WMware TIME
- Launch vSphere Client.
- Go to Configuration > Time Configuration > Properties.
- Input the correct Time and Date.
- Click Options.
- Click Restart on the Service Commands box.
-
Connect to an ESX host using an SSH client.
-
Log in with an user having administrative privileges.
-
To open up the ntpClient port in the internal ESX host firewall, run the commands: esxcfg-firewall -q ntpClient
esxcfg-firewall -e ntpClient
esxcfg-firewall -q ntpClient
Note: The first line tells the status of the ntpClient port. The second line enables the ntpClient port. The third line shows you that it is open.
-
Now set the system time to the right time. If your ESX host has ntp access to the Internet, you can just issue the ntpdate command, with the -u switch, and point it at an ntp server. If your ESX host is blocked by your corporate firewall, you have to point it at an internal ntp server. If you do not have one, you have to set one up. Any of these ntpdate command should work: ntpdate -u pool.ntp.org
ntpdate -u north-america.pool.ntp.org
ntpdate -u 0.us.pool.ntp.org
Or for example, if your internal ntp server was called ntp.yourdomain.com, you would issue the command: ntpdate -u ntp.yourdomain.com Note: Some programs react badly to sudden large changes in system time. For this reason, just updating and restarting ntpd as described below is preferred by some ntpd updates the system clock slowly for this reason. -
Configure the ESX host as an ntp client. Make a backup copy of /etc/ntp.conf using the command: cp /etc/ntp.conf /etc/ntp.conf.bak.`date +%d%m%y`
-
Create a new ntp.conf file that contains this information: restrict 127.0.0.1
server 0.us.pool.ntp.org
server 1.us.pool.ntp.org
server 2.us.pool.ntp.org
server 3.us.pool.ntp.org
server north-america.pool.ntp.org
server pool.ntp.org
server 127.127.1.0 # local clock
fudge 127.127.1.0 stratum 10
driftfile /var/lib/ntp/drift
broadcastdelay 0.008
Note: This ntp.conf assumes that the ESX host can send an ntp request out to the Internet. If you have outgoing ntp traffic blocked by your corporate firewall, you must instead set up an internal ntp server and make sure that it has access to the Internet so it can get an accurate time. While it is possible for you to configure one of your ESX hosts as an ntp server as well as a client, we recommend that ESX hosts be used solely as ESX hosts, and that they not be used for supporting IT infrastructure needs like ntp. If your corporate firewall has ntp access blocked to the Internet, then your ntp.conf file should contain something like this, under the assumption that you have an internal ntp server, which separately has Internet ntp access: restrict 127.0.0.1
server ntp.yourdomain.com
server 127.127.1.0 # local clock
fudge 127.127.1.0 stratum 10
driftfile /var/lib/ntp/drift
broadcastdelay 0.008 -
Restart the ntpd service using any of these commands: service ntpd restart
/etc/init.d/ntpd restart -
Update the hardware clock with the current time of the system clock. Even though the system clock is updated from a known ntp server which has the right time and reconfigured ntp and restarted ntpd service, when the machine reboots, it sets its system clock based upon the time from the internal hardware clock. /sbin/hwclock –systohc
Source:
22 stycznia 2014
OVM and VMWare comparison.
Migrate from vSphere into Oracle VM 3.0
By Steen Schmidt on Dec 06, 2011
So I just took a vmware image of a Linux converte into a ova (Open Virtualization Archive) file, then I was able to do a import through the OVM manager. When this assemblies had been loaded, it was unpack and the next step was to create a Clone from my new Template.
And “voila”, I had a running VM with Linux in Oracle VM 3.0, imported from VMware.
So it could not be more simple, and it works.
This article covers the steps to migrate a VMware ESX virtual machine over to an Oracle Virtual Machine. These steps should work with either OVM 2.x or 3.x
Step 1.
Download and install “VMware OVFTOOL 1.0” from the VMware site. You must register to get it.
Step 2.
Unzip your VMware appliance into a directory on your windows or linux machine.
Step 3.
Run the following command to export the vmx file to ovf
C:Program FilesVMwareVMware OVF Tool>ovftool.exe –skipManifestCheck c:temp
opsview-applianceopsview-appliance.vmx c:tempjohn.ova
Opening VMX source: c:tempopsview-applianceopsview-appliance.vmx
Opening OVA target: c:tempjohn.ova
Writing OVA package: c:tempjohn.ova
Disk Transfer Completed
Step 4.
Import the charliebrown.ovf into OVM 3.x as an assembly. Once charlie has been imported create a vm from the template as usual.
Step 5.
Grab a glass of milk and a cookie.
Source:
http://www.davemalpass.com/how-to-migrate-vmware-appliances-to-ovm-3/
ORACLE – archive log mode.
SQL> startup mount
ORACLE instance started.

Total System Global Area  184549376 bytes
Fixed Size                  1300928 bytes
Variable Size             157820480 bytes
Database Buffers           25165824 bytes
Redo Buffers                 262144 bytes
Database mounted.

SQL> alter database archivelog;
Database altered.
ORACLE – Renaming and moving files.
17 stycznia 2014
Windows – prawa administratora
Ano tak … wracamy do super systemu ![]() Jestem jego prawdziwym fanem, nie pozwala mi się nudzić.
Jestem jego prawdziwym fanem, nie pozwala mi się nudzić.
Case study:
Windows 2008 Server Enterprise (brzmi dumnie)
grupa “administratorzy” – przytoczę opis (wzięty z systemu) – “Administratorzy mają pełny i nieograniczony dostęp do komputera/domeny”
Zajebiście – o to mi chodziło.
To uruchamiam polecenie “at”. No i skończyło się administrowanie, przywileje, radości … BRAWO!!! – Być adminem tylko z nazwy – to lubię!!!!
Czytamy … co zrobić, aby administrator był administratorem …
Usługa Harmonogram – sprawdzam – uruchomiona.
No tak UAC (pomógł telefon do przyjaciela – admina Windowsów) – prawy przycisk myszy na CMD -> uruchom jako administrator (kuźwa … a kim ja do tej pory byłem???) i problem rozwiązany
UAC – User Account Controll
Turning off UAC
Use the following procedure to disable UAC entirely.
To perform the following procedure, you must be able to log on with or provide the credentials of a member of the local Administrators group.
Important: Turning off UAC reduces the security of your computer and may expose you to increased risk from malicious software. Microsoft does not recommend leaving UAC disabled.
To turn off UAC
Click Start, and then click Control Panel.
In Control Panel, click User Accounts.
In the User Accounts window, click User Accounts.
In the User Accounts tasks window, click Turn User Account Control on or off.
If UAC is currently configured in Admin Approval Mode, the User Account Control message appears. ClickContinue.
Clear the Use User Account Control (UAC) to help protect your computer check box, and then click OK.
Click Restart Now to apply the change right away, or click Restart Later and close the User Accounts tasks window.
Disable Admin Approval Mode
Use the following procedure to disable Admin Approval Mode.
To disastrongle Admin Approval Mode
Click Start, click All Programs, click Accessories, click Run, type secpol.msc in the Open box, and then clickOK.
If the User Account Control dialog box appears, confirm that the action it displays is what you want, and then click Continue
From the Local Security Settings console tree, double-click Local Policies, and then double-click Security Options.
Scroll down and double-click User Account Control: Run all administrators in Admin Approval Mode.
Select the Disabled option, and then click OK.
Close the Local Security Settings window.
http://www.serverintellect.com/support/windowsserver/2008-uac/
Na marginesie:
tak się uruchamia at:
at 22:00 /every:M,T,W,Th,F C:\ora_back_skrypty\orabck_personel.bat
lub
at 22:00 /every:Pn,Wt,Sr,Cz,Pt C:\ora_back_skrypty\orabck_personel.bat
kasowanie
at 7 /delete


